Google has finalized the transition from Universal Analytics to Google Analytics 4 (GA4). Universal Analytics properties will be retired on July 1. The retirement process will delete all website data stored in Universal Analytics. If you would like to maintain access to the historical website data stored in your Universal Analytics property, below is a process you can follow to do so.
To be clear, these steps are only necessary for those seeking website data older than 2 years. GA4 has been collecting data on campus websites for the last two years, and will continue to do so going into the future.
Backup Process
Repeat these steps for each property that you wish to back up historical data from.
-
Import custom reports to your site (list of custom reports at bottom of email)
-
Open the link (report list below) for the report that you wish to import
-
On the import view
-
Click the Select a View dropdown and select the view that you wish to import the report to
-
You can use the search feature to simplify finding the property if you manage many Analytics properties
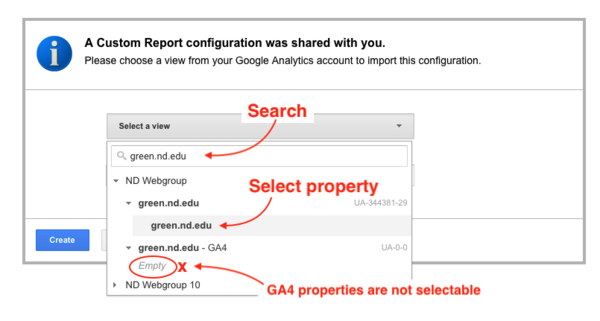
-
-
Note: Bundled reports will include a list of all included reports. If a report in the list isn't applicable to your data, you may uncheck the checkbox for it to exclude it from the import process
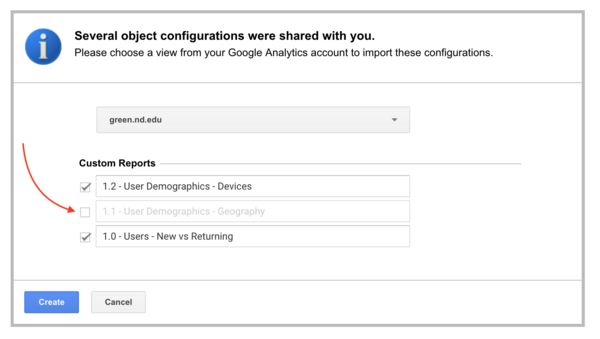
-
Then click the Create button
- You can choose to begin exporting the data in the reports now, or continue importing more reports
-
-
-
Export data from the custom reports (this will need to be done for each report, each tab in the reports, and each date range you would like to export)
-
Navigate to the Universal Analytics property that you wish to export reports from
-
In the left-hand menu, go to Customization > Custom reports
-
note: if you don't see "Customization" in the analytics property menu, then you aren't in a Universal Analytics property
-
-
Click on the report title link from the list to open it
-
Select the date range that you want to export (top right of the report)

-
note: the last date that Universal Analytics properties captured data was July of 2023
-
You can also select comparison timelines in the date picker
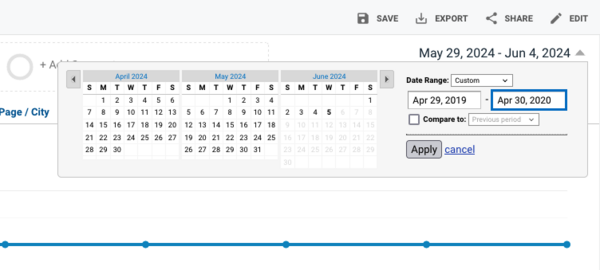
-
-
Select the tab in the report that you wish to export

- Select the number of rows you wish to include in the report in the bottom right of the records table (the default number included is 10)
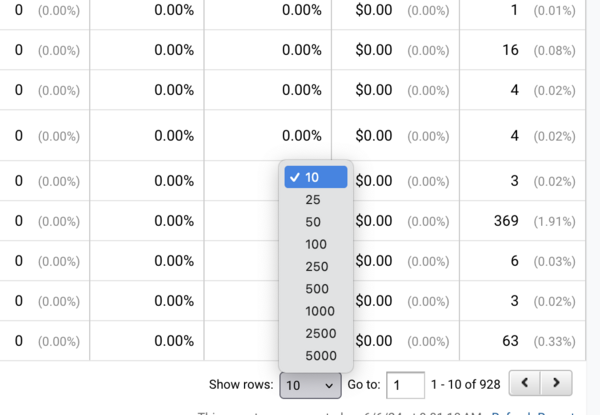
-
Click on the Export action button (seen just above the date range) to open the options dropdown

-
Select how you would like to export the Data: PDF, Google Sheets, Excel, CSV
-
Save the file to your computer (if exporting to PDF, Excel, or CSV)
-
-
-
Custom Reports for Importing
-
-
Users - New vs Returning
-
User Demographics - Geography
-
User Demographics - Devices
-
-
-
Traffic Acquisition Sources overview
-
Acquisition - traffic from Social Media
-
Acquisition - Landing Pages
-
Acquisition - SEO Overview
-
Acquisition - SEO Keywords
-
Acquisition - SEO Not Provided
-
Acquisition - Campaign Data
-
-
-
Behavior - Pageviews
-
Behavior - Clicks and Download Events
-
Behavior - Outbound links
-
Be sure to complete these steps prior to the July 1 deadline. If you have any questions about the process please contact webhelp at webhelp@nd.edu